Turkish Coffee Brewing Technique - Simplified with Pictures
Share
In this short version of my Turkish coffee brewing technique you will get the basics which will elevate your coffee flavor right away.
There are only two biggest things that you need to know about Turkish coffee - foam color and motion.
The reason why they’re so important is simple - control of the flavor. Because under extracted (think of it like under cooked) coffee could be sour and over extracted - bitter and tasteless. And we need to be exactly in the middle to have a balanced taste.
But first, we need to create the foam which we will be controlling.
Contents
- Turkish coffee - Ratio
- Turkish coffee - Grind size
- How much coffee can I brew in my coffee pot
- How to brew
- Actual taste adjustment
- Video tutorial
Turkish coffee - Ratio
The dose of coffee that we use is 10 g of coffee for each 100 g of water. Meaning, the ratio is 1:10. That way we will get a proper, concentrated but easy to drink beverage.
Turkish coffee - Grind size
In this case we’re going to use espresso grind size and smaller (it’s not required to go too small like a powder, anything smaller than espresso will do. Meaning, commercial espresso without pressurized basket).
ReferenceIf you happen to have a Comandante C40 - use 7 clicks and lower. I prefer 2-4 clicks mostly. If you own a Kinu m47 - use one rotation of the dial (setting 1.0) For Timemore c3 - use the lowest espresso setting which the user manual recommends.
How much coffee can I brew in my coffee pot
I recommend filling up to 70% of your Cezve (Coffee pot). If it’s 200 ml full - use 140 g of water and 14 g of coffee. And yes, you can use your 500-600 ml pot as well. But you’ll need to share the coffee with 3-5 people.
How to brew
- Add ground coffee Add water (not higher than 60°C,room temp is preferred)
- Mix and put on the heat source (set medium or medium-low heat)
- Start a stopwatch and mix at 1 minute mark. Let’s linger on that
Mixing is VERY IMPORTANT. We mix now because we need to create a foam layer. If you use a light or medium roast the foam will be white. If dark roast - the foam will be darker.

Our goal is to achieve the foam layer without coffee particles. That way we will be able to control the flavor of our coffee.
If you use a big pot (over 200 ml) - better to mix at around 2 minutes mark. Because we need relatively hot water so that CO2 will be released from the coffee particles more easily.
- OK, we have foam. Let’s wait for coffee to heat up to the point when the foam start to move and change color
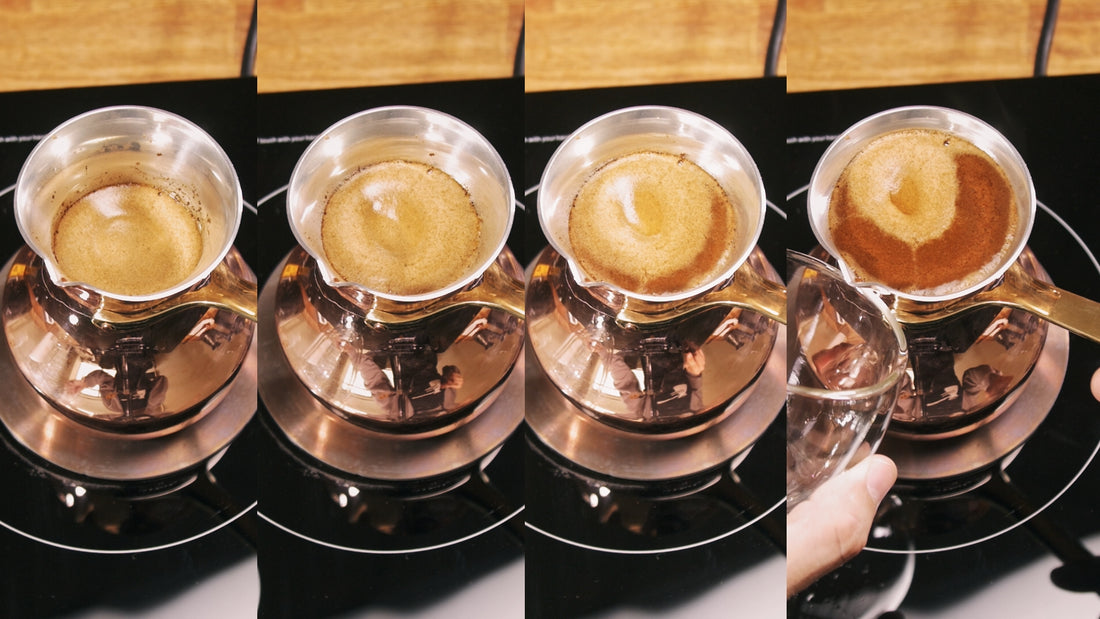
- When foam starts to wrap or move - it’s a sign that we’re almost ready to take it off the heat and serve immediately.
Sometimes it’s a motion from the sides, sometimes - it “overflows” from the center. I prefer to call it “crack” when it “bursts” from some place of the foam. That’s usually the sign that it’s ready.

Here are the photos with the foam color change (last photo - I’m taking the coffee off the heat).


Actual taste adjustment
Now you’ve seen the photos. It’s time to adjust your coffee. Because every coffee is different and needs to be taken off the heat with a different foam color.
Usually, golden middle is to take it off when the central bright spot is almost “squeezed” from the sides. Do this first. Then, analyze your cup of coffee (when it cooled down well enough to perceive the flavor of course).
If coffee is sour or too watery - you can brew it longer next time. Meaning, let the wrapping motion change the color of the foam completely. Or possibly even make it crack (burst).
If coffee is bitter or “tasteless” - take it off earlier. Like, when it only starts to wrap from the sides. This is usually the case when you have some delicate flavors in your coffee and don’t want to cover them with “chocolate” and “nuts” which is a basic taste.
That’s it. Now you’ve mastered it
If there are some questions left - you can use a comments section. Or even chat (because you can upload photos there).
There is enough knowledge to have a 90% chance of a tasty cup. Enjoy.
Video tutorial
Additional knowledge. How to approach brewing "basic" and "specialty" coffee.


